We tell and show how to give the finished embroidery a decent design!
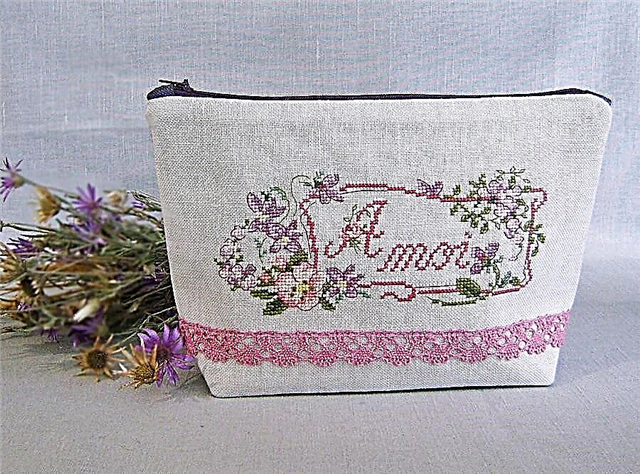
If you embroider a cross or a satin stitch, you probably know how relevant the question is, how to design a finished embroidery. Most often, embroidered work is framed as a picture - in a baguette. But a small embroidery may well become the basis for a cosmetic bag. Even the beginning seamstress will cope with such design!

You will need:
- finished small embroidery
- matching fabric color for embroidery
- lining fabric
- nonwoven for sealing
- lace for decoration
- zipper. Lightning can be long (paid)
- stitching pins
- sewing thread and tailor's chalk
Step 1. Cutting

When sewing cosmetic bags with embroidery, it is impossible to give an exact embroidery pattern, because the sizes of the cosmetic bag depend on the size of the embroidery. Using the example of a master class, I will show how to calculate the size of fabric for sewing cosmetic bags with embroidery.
We embroider embroidery with non-woven fabric, if you want to decorate a cosmetic bag with lace, sew it.

We measure the size of the workpiece with embroidery. In my case, it is 24x16 cm. Important - this is taking into account 1 cm allowances on each side.
Then, on a companion fabric, we mark a rectangle 24x21 cm (24x16 + 6 cm on the formation of the bottom of the cosmetics bag).If your embroidery is smaller, then you can add 4 or 5 cm to the formation of the bottom.

Tip: when choosing a companion fabric, be sure to bring embroidery to the fabric store to check the combination of fabric colors and embroidery. The cut rectangle is also sealed with non-woven.
We peel off embroidery and fabric companion and sew. You have a blank of the front part of the cosmetic bag.


By the size of this blank we cut the lining of the cosmetic bag.

Step 2. Processing the zipper
We measure the necessary length for the fastener of the cosmetic bag. It is important to take into account when measuring that the zipper will be embroidered with allowance for seam allowances. That is, with a zipper, it is necessary to note a length shorter by 2 cm than the top of the cosmetic bag.

From the main fabric we cut out two 5x5 cm squares. Sew them exactly along the marked line. We shorten the zipper to the desired length.
How to make a zipper of the desired length: 3 easy ways


We turn the hem of the zipper to the wrong side, so that in finished form this hem is not more than 1 cm. Stitch the hem. We cut off the excess lining fabric.

Step 3. Sewing the zipper
Fold the zipper and top cut of the makeup bag with the front sides. Chop off. Make sure that the ends of the treated zipper do not protrude beyond the seam allowances.
5 simple tips on how to sew a zipper
Sew the zipper into the upper sections of the front of the cosmetic bag. At this point, do not invert.

Similarly, sew a lining to the zipper. The blank of the cosmetic bag at this stage can be turned out and stroked.


Step 3. Side seams of the cosmetic bag
Open the zipper, otherwise you will not be able to turn out the finished cosmetic bag, and turn the blank inside out.
Fold the blank so that the lining and face parts are folded with their faces facing each other. Chip and sew a makeup bag (one seam for the lining and the front) on each side. It is important that the seam does not capture the machined ends of the zipper, i.e., the seam allowance should be at least 1 cm.

When stitching the lining details on one side, leave 8-10 cm un sewn. They are necessary for turning the cosmetic bag out.

Step 4. The formation of the bottom of the cosmetic bag
Fold the side seams of the makeup bag so that you get corners.
We chop and measure 5 cm (2.5 cm from the seam). For convenience, mark the future seam with the help of a tailor's chalk.

We make seams on all corners and cut off excess fabric.

We turn out the cosmetic bag, sew in an unstitched seam with a hidden seam, through which the cosmetic bag was turned out. The cosmetic bag is ready! Now it can be ironed and used for its intended purpose or, for example, presented as a gift!

Good sewing!
Felt cosmetic bag with embroidery: master class + pattern
The author of the master class: Bukurova Galina

By education, Galina is a history teacher and lawyer, but she has always been engaged in needlework.
She studied sewing from magazines, primarily Burda fashionable, books and the Internet, so although she can be attributed to self-taught, but she tries to improve her sewing skills.
Recently, Galina has been engaged in applied embroidery design. Sews bags, cosmetic bags, embroiders tablecloths.In addition to her own embroideries, she also embroiders other embroiderers.
Her work can be seen on social networks Instagram and VKontakte.